
Fast And Easy Chicken Doorstopper Or Something Fun To Make
Sew This Funky Chicken Just For Fun.
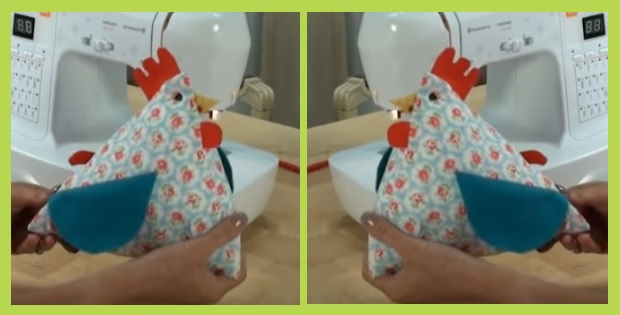
This pattern shows you how to make this quirky little character. Use it as a doorstop, over sized pin cushion or just to keep you company! It’s amazing how this simple little chicken sewing pattern can be used to change the atmosphere of any room. Immediately adds a little color to the kitchen. A cute chicken to have early morning coffee with and start your day with a smile. Make a couple of extra chickens and give them as gifts to cheer anyone up. Besides they’re such fun to make, and all that is needed is a few fabric scraps. These chickens look great in any color.
Start with:
2 pieces of fabric 10 inch squares
1 piece of yellow fabric for a beak
2 x 4 inch diameter semi circles for the wings
1 Piece of orange felt from which you will cut:-
– An oval shape and then cut the end straight off to go underneath the beak.
– A comb for the top of the chickens head. Just cut it free hand. A straight piece, and then perhaps two or three wavy bits at the top ( you can kind of imagine what a chickens cocks comb looks like). Cut the straight end a little longer as it is going to be sewn into the seam.
– A tail. Cut a sort of an arc then 3 waves which is supposed to be the feathers of the tail. You can draw a template first if you like. Some people just cut it free hand.

Sew the wing to the right side of the 10 inch square fabric. Place the wing right in the centre of the fabric. Do the same on the other piece of 10 inch square fabric.

Just a tip: If you would like to put any embellishments on your chicken pattern, it should be done at this point before you stitch the chickens body together. You could even sew some feathers on!
Position the comb, tail and beak…

Place the yellow beak…

Turn the beaks, cockscomb and tail in as shown below.

Place the next 10 inch fabric square, right side down on top. Stitch 3 sides and turn outwards. Stitch the fourth side, leaving enough room to place the filling. Stitch the eyes on, and you have your chicken!

Full the full pattern tutorial watch the video below.
Images:Youtube debbie shore


