
How To Make A Bubble Quilt
Simple Instructions On How To Make A Bubble Quilt
I’ve put together two videos showing how to make a bubble quilt. The first video will show you how to make the bubble. The second video will show you exactly how to make a bubble quilt. Also known as a puff quilt.
This is such cute DIY idea made from little as pieces of scrap fabric and some Poly-Fill (or any other fluffy filling).
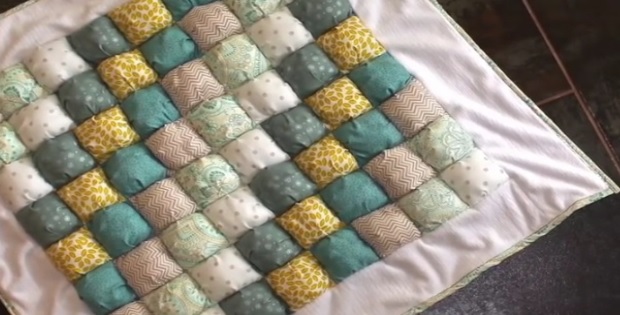
Make a large and comfortable quilt rug, or a smaller one for your toddler.The colourful design and bubble pattern makes it so inviting to lounge on. Kids are attracted to the different colours and like to squish the bubbles.
Here’s a basic pattern for a toddler size quilt, which will work out to be about 27 inches by 47 inches in total.
What you’ll need:
– 16 different colors of scrap fabric. Work out a monochromatic colour theme, or just random bright colours.
– 1 yard of plain fabric for the base of the puffs. The colour doesn’t matter because you won’t really see the underneath of the puffs.
– 1 yard fleecy sort of fabric. Minky is good, it’s a bit thicker and softer.
– 1 1/2 yard soft cotton fabric for the ruffle. You can use silky fabric too.
– Some Poly-Fil.
Cut out 66 squares 6 by 6 inches, of the different colored fabrics. Lay them out to help decide how you want it to look.
For the backing of the puffs, cut out another 66 squares, 4.5 by 4.5 inches each.
To make the puffs, place the two squares together. The larger square, which is the top of the puff, must be right side out. Pin four corners of each square together. You’ll see it better in video 1.
Make two pleats on each side of the square and pin in place. On each side, the folds should go in towards each other and make it so that the larger square sides match up with the smaller square’s sides. Do all four sides like this.
Now sew around your square using slightly less than a 1/4″ seam to secure your pleats. Leave one of the corners open, but make sure your seam goes past the pleats on each side.
Stuff all 66 puffs with Poly-Fil. Don’t stuff them too full. A little more than three quarter full. If they’re too big, it’s very difficult to work with on the machine. Arrange the puffs to get the look you want. Pin two puffs together and stitch one side. Use a zipper foot to get the seam closer. Sew 6 in a row, and then sew the rows together to form the bubble quilt.

To make a ruffle, cut six strips out of my your cotton or silky fabric 8inches wide. Stitch the strips together at each end to form one long strip, and one complete round. Fold the fabric over, lengthwise, wrong sides together if the fabric has a right and wrong side.
Pin the fabric edges and stitch about a quarter inch in, using a basting stitch. Stitch the entire ruffle. Then pull the threads to make a ruffle. Just work at it, positioning the ruffle as you go. Pin the ruffle to the minky and adjust the ruffle until it fits the exact size of the minky.
Cut our your minky to the size of your bubble top. Lay the puffs right side up and your minky and ruffle piece right side down on top. Make sure the ruffle is in toward the center. So now you have the selvage of the puffs and the selvage of the minky with the ruffle tucked inside. Pin in place and stitch together.
Just keep checking as you sew that you haven’t caught any of the ruffle in the stitching. Leave about twelve inches un-stitched. That’s where you are going to turn the puff quilt inside out…or right side out as it were. Then hand stitch the opening to finish.
You’re done and ready to snuggle!
Watch the first video on how to make a bubble.
Watch the second video on how to make a bubble quilt. Have fun!
Images:Youtube Audra Kurtz


