
Log Cabin Quilt Block Right Through To A Beautiful Finish
Not Only A Log Cabin Quilt Block – It’s The Finished Quilt. Just Beautiful!
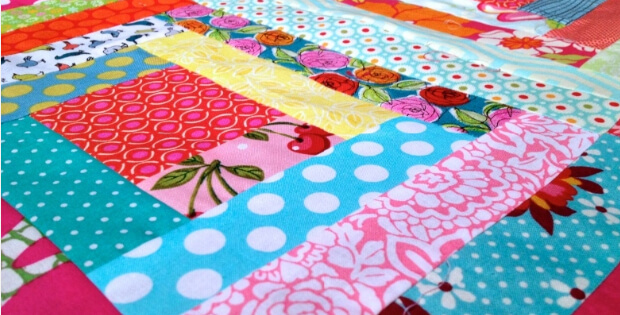
The prettiest block achieved with this log cabin quilt block using random color and print fabrics, from roses to polka dots all mixed together. Once you have the cutting sizes all done, just go ahead and sew the strips together using the heart pin shown in this delicious log cabin quilt block video. And look how quickly the blocks are done. I love the colors, They are exciting and so pretty to make a block from. It spurs you on to make the next one. You just don’t want to put it down.

What a great idea to pre cut the strips and place them in each size in bags. Then when you’re sewing simply grab a piece out and stitch it on. Ok, if you take out a piece that doesn’t quite match the block you’re putting together, throw it back in the bag and take another one. You can use the other one in the next block. What fun! I call this freedom of choice!

Here are the sizes to cut and what you will use for each block. Have fun choosing your colors from your fabric stash!
1 x 3.5 x 3.5 in. square
1 x 2 x 3.5 in. strip
2 x 2 x 5 in. strips
2 x 2 x 6.5 in. strips
2 x 2 x 8 in. strips
2 x 2 x 9.5 in. strips
2 x 2 x 10.5 in. strips (PLEASE NOTE: the video states this strip length 10.5″, but it should be 11″)
1 x 2 x 12 in. strip
Then throw them in the marked bags. Easy!
To sew them up, you’ll use a ¼ inch seam throughout the block.
You’ll need 54 of these blocks to make a twin sized quilt.
Start with the center square. Place a pin in the middle of the square. Use something like a heart so you can always see which side of the block you’re working with.

Place the 2 x 3.5 in. piece on the right side of the center square, fabric right sides together. Stitch.Press.
Turn your block counterclockwise a quarter of a turn, and add the 2 x 5 inch piece. Sew along the right edge. Press.
Rotate the block counterclockwise once again. Sew the second 5 inch strip to the square. Press.
Turn the block counterclockwise again and sew the 6.5 inch strip at the top of the center block. Don’t forget to press. Rotate counterclockwise and add the other 6.5 inch strip to the right of the square.
Continue till the block is complete. Once you’ve done the first block you’ll get the feel of it and it will go quite quickly.
If you find a piece that’s a little too long, simply trim off.

I’ve put this log cabin block video in. It’s nice to watch to get a total feel of the whole thing. There’s a second video below this one to show you how to assemble the blocks and complete the log cabin quilt with layering. And I’ve put a third video below that to show you how to bind this beautiful log cabin quilt and mitre the corners.
(PLEASE NOTE: the video states 2 strip lengths of 10.5″, but it should 11″ in length, not 10.5″)
Watch this video on How to Assemble the Log Cabin Block Quilt.
Now you’ve completed all the steps on making your log cabin quilt blocks and you’ve joined the quilt blocks and layered the quilt. Watch this video on how to bind your well achieved log cabin quilt, and mitre the corners and an invisible join.I think you’re in for a great quilting week-end!
Bookmark this page so that you can get back to it easily as you’re making the log cabin quilt.


