
Sunbonnet Sue Zippered Pouch Tell Your Own Story
Sunbonnet Sue Zippered Pouch To Make Add Your Own Special Touch.
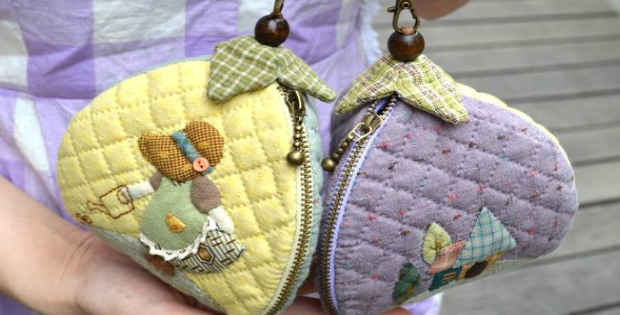
It’s not every day that you come across a Sunbonnet Sue zippered pouch that you can make yourself and add a few extras to make it your own. This Sunbonnet Sue pattern tutorial offers just that. This little pouch is all hand sewn. Once you have the templates, it’s easy to cut out a perfect Sunbonnet Sue. Then, get creative adding the dress, apron and bonnet finishes. I can’t imagine any Sunbonnet Sue not being just adorable.
Tiny scraps of fabric are quite sufficient for this project. Find bits and bobs for the bonnet, adding a button and some lace here and there. While this pouch would make a priceless gift (priceless because money can’t even buy it…you have to make it), I doubt if you could muster the strength to give it away. It would have to be someone very very special to get this as a gift, made with so much love.
My heart just melts when I look at this pouch made up into a triangle and topped with leaves.
There are no instructions with this pattern tutorial so I’ve collected all of the Sunbonnet Sue templates, flowers and other bits and pieces you might make use of while you’re designing this magical project.
While I have found the template downloads, you will have to use some creativity to draw the shape of the pouch, but that’s easy to follow from the tutorial. The get the unique shape of the purse, simply place some tracing paper against your computer screen and trace the shape. Then enlarge as you feel. Do the same for the base. You might want to match sizes using paper, or paper towels to begin with. Then simply stitch together as shown in the Sunbonnet Sue Zippered pouch tutorial.
Begin with making your Sunbonnet Sue. Cut the fabric pieces out from the templates and arrange them until you’re happy with your Sunbonnet Sue. The tutorial is for two zippered pouches. When making one pouch you will make one Sunbonnet Sue, One Garden and the third panel of the pouch remains plain.
Download your free Sunbonnet Sue from the link below. Here are some ideas the dress your Sunbonnet Sue. Lay Sunbonnet Sue onto the background fabric. Add an oval piece for the grass as shown. Stitch to fabric.

Here are some garden layout ideas. You can easily draw these free hand, or else download the free shapes from the link at the bottom. Use a different fabric for this background. Stitch garden layout to fabric.

Turn the fabric over and outline the shape.

Cut the shape out leaving 1/4inch seam allowance. Repeat for the side with the garden motif. Cut one more side as there are three sides to this pouch pattern. The third side has no motif.
 Cut out the same shape for the backing fabric for all three sides. Cut the same size for the light weight batting. Layer and stitch all the way around, leaving three inches unstitched. Turn right side out. Hand stitch the opening as shown.
 Quilt the fabric with diagonal stitching without quilting over Sunbonnet Sue.

Repeat for the garden side, and the third side where there is no motifs.
 This what it looks like at the back. As you can see Sunbonnet Sue is not quilted.
 Repeat for the third side using your choice of fabric.
To make the base of the pouch. Cut two triangle pieces out of fabric as shown.

Cut out the same shape in batting, 1/4 smaller just eye balling the size.
 Stitch fabric right sides together and batting on top. Leaving around 3 inches unstitched. Turn right side out being sure to push out the corners. ( I use a chopstick to do mine) Stitch up the opening. Sew a line of stitching 1/4 inch in from all three edges. Set aside.

Pin the zipper in on what would be the inside of the purse.
 Stitch the zipper to the pouch. Then stitch the fabric edges of the zipper to keep it nice and neat. Repeat attaching the zipper to the side with the garden motif. Finally, stitch the end of the zipper to secure.
 Sew the triangle base to all three sides at the bottom.


Attach a loop and feed it through to the right side of the pouch. Finish stitching up.

Sunbonnet Sue zippered pouch inside out.

To make the leaves,fold fabric in half right side together. Cut out 3 leaves which will give you 6 leaves in total. Stich fabric right sides together leaving a small area un stitched. Turn right side out and finish stitching.
 Sew some stitches down the middle of the leaf as shown. Stitch three leaves together.
 Unzip the purse. Feed the loop through a wooden bead and attach the handle with an eye let clip.

View of underside
 Isn’t this Sunbonnet Sue zippered pouch adorable!

Please note: When you click through to get the Sunbonnet Sue template, you’ll notice different Sunbonnet Sues. Choose the one you like(or choose all!) Simply click on the picture of the one you would like and you’ll be taken to the print page where you can print the template out.
Have some great fun!
Click here if you would to see more tutorial details and some different Sunbonnet Sue motifs used for these adorableness zippered pouches!


