
What if You Could Make A T shirt Quilt Today?
How To Make A T shirt Quilt – The most Unrecognized Quilt.
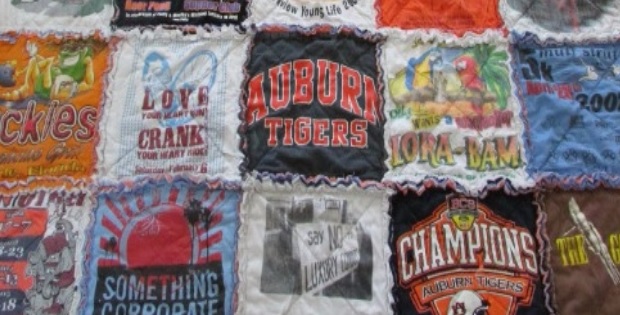
A T shirt quilt is a great way to take an old item with memories attached to them, and turn them to something new and useful.
Like so many people, I’m sure you’ve got a bag full of t shirts in your closet. And this bag just grows in size as you feel you never want to throw That T shirt out. After all it was your favorite.
At first I thought I would make the perfect t shirt quilt but, to be honest, I knew I would not have the patience to make all those exact squares, and create a binding for the perfect quilt finish. So in comes the rag quilt, also known as the non-quilter’s quilt. Rag quilts are very forgiving. So if you’re not a perfect quilter, move on. Lets make a t shirt quilt, rag or otherwise.

Here is what you will need:-
1. Cotton t shirts , about 15 to 20 or so, each with different themes. You might have one from high school, one from college, one from basket ball etc. Be creative. Choose a theme.
2. A rotary cutter and cutting mat are highly recommended. This helps make cutting less of a task for sure.
3. Flannel or fleece for the filling.
4. A GOOD pair of fabric scissors, if you can get your hands on one.
(hey, this is a 1, 2, 3, 4 tshirt quilt pattern!)
Then, go through your t-shirts and decide which ones you might use. You can get away with squares at 12 inches x 12 inches. 14 x 14 is a better size because if you have bigger squares you won’t need as many tshirts and a little less sewing to do. You can decide the size of the quilt in the end. It’s up to you.
Once I had cut the first T shirt square for my t shirt quilt, I used that as the template to cut the other shirts, (or use the paper template as shown in the video). When you are deciding how large you want your squares, remember you will lose an inch or so, to the seams.
Cut the front and the back of the shirts separately to ensure you get the best portion of the picture. You could use a piece of flannel as the backing if you want to. The squares don’t have to be perfect, but they should be the same to get the best result, so try your best to get them right.
Use flannel or fleece for the filling (see the video). Use white flannel/fleece for the white shirts so a different color does not show through the tshirt fabric. Three layers of flannel in each t-shirt square make the quilt really heavy, so rather use two. It’s also easier to sew.
Sew the t shirt square together, that is the top of the square, the flannel and the backing. The video below makes it a bit clearer. Stitch all four sides to make a complete block. Lay the back of the t-shirt right side facing down, followed by the two layers of flannel squares, and finally the front of the t-shirt on top with the right side facing out. You can decide if you want your t shirt quilt to be a ‘rag’ quilt or not. A rag quilt has the seams exposed giving it a ‘rag’ look. Pin the square together, then stitch.
Just a tip here: Go a bit slower when stitching over a print, as the machine sometimes doesn’t sew as smoothly over the print.
The placement.
Decide how you want to place the squares… the position you would like each one to be in the quilt.
Decide which will be the back of the quilt. Then sew the seams so that they will show on the outside, or top side of the quilt. This will be the ruffle of the quilt, which is why it’s called a ‘rag’ quilt. You also need to decide how much ruffle you want. If you want a larger, more noticeable ruffle, leave more fabric exposed at the seams. For less noticeable ruffle, leave less fabric exposed at the seams. Half inch seam width works well.
Be sure to sew around the border. You will want it to ruffle there too. To complete a rag quilt, all that is left is the cutting. Cut a notch into the ruffle every quarter to half an inch or so. Do not cut past where you sewed. And yes, you have to cut notches on all of the exposed seams. There’ ll be a lot of cutting which is why I suggested getting a GOOD pair of fabric scissors.
Once you have done all of the cutting, throw it in the washing machine. For larger size quilts, you may want to consider taking it to a dry cleaners. There will be a lot of little strings from the fraying in your washing machine and dryer.
Once you have your placements, pick up the first row of squares,and sew them together. Once the entire row of squares ( 5 squares across) is sewn together, put the row back in position with the lay out on the floor. Finally sew all of the rows together.
This is how you can plan making your t shirt quilt.
Day 1–Pick t-shirts for your quilt
Day 2–Cut t-shirt squares
Day 3–Cut flannel squares
Day 4–Sew t-shirt squares together
Day 5–Decide on t-shirt placement and take picture
Day 6–Sew all of the rows
Day 7–Sew the rows together and sew border
Day 8–Cut notches on the exposed seams (if it’s t shirt rag quilt)
Day 9–Wash and dry
Day 10–Done and ready to snuggle!
The pattern above is for a rag quilt.The video below will show how to make a Tshirt quilt. It will be with the rag. Both are just as nice. You decide.
Watch the video too for extra tips and stuff.
Feature Image: sweetteainthesouth.com Image:Youtube CathieAndSteve


