
Exciting New Quilted Tote Bag To Make
Make This Stylish Quilted Bag – It’s Gorgeous!
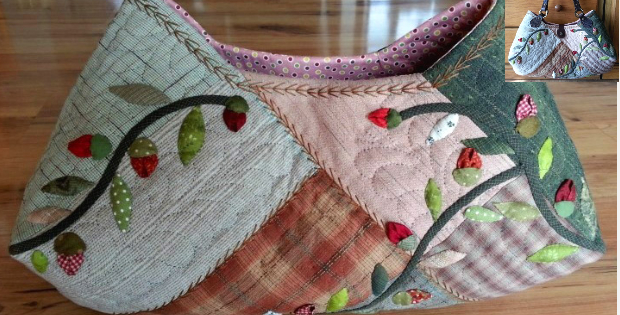
Tote bags often look too floppy for my liking. There are a lot of great patterns out there, but none quite as stylish as this one. The tutorial consists of a diagram and pictures to make the tote from start to finish but without measurements etc., so I set aside some time to do the math. I have worked out a couple of measurements and sizes to kind of map out the pattern. Hope it will help save you some time working it out.
For the vines and roses, follow the pictures or place the embellishments as you like. Use your creative side and come up with your own signature design!
I printed out the pattern and scaled it three times up. Based on my scale-up, the finished size of the bag in the images will be approximately:-
12 inches in length (30cm length) and
6 inches wide (15cm wide)
7 1/2 inches (19cm)at the highest point (and around 5 inches (13cm) at the middle point).
Take a look at this beautiful bag and it’s actually quite easy to make. I love it!

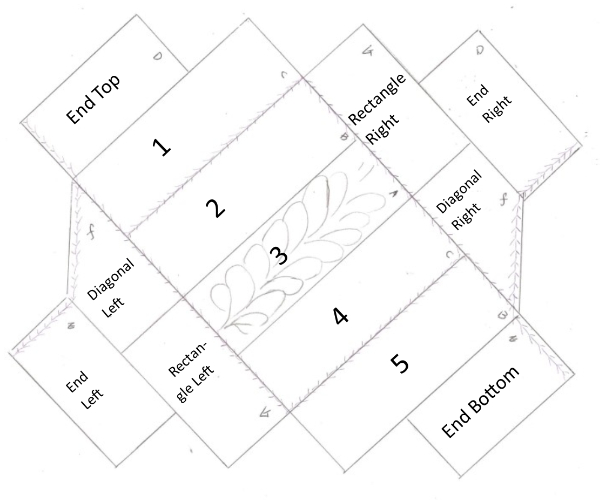
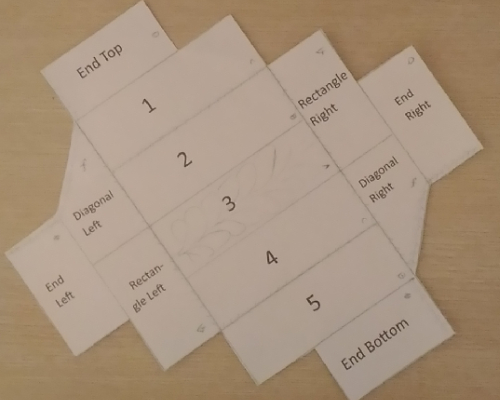
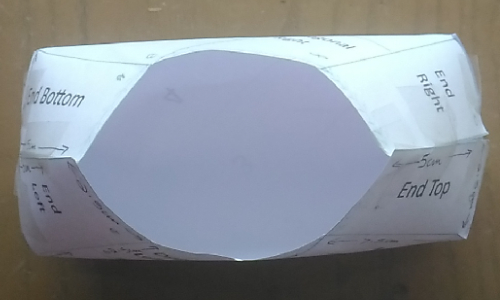
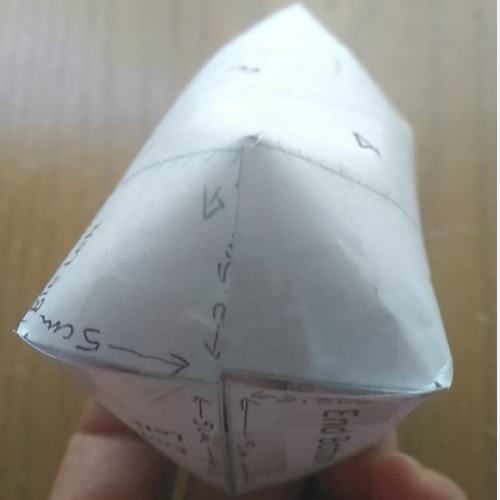
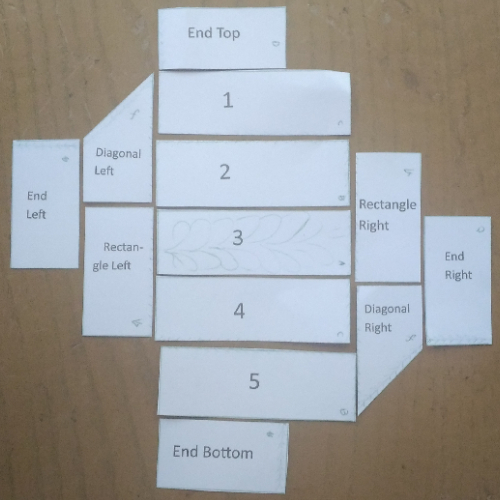
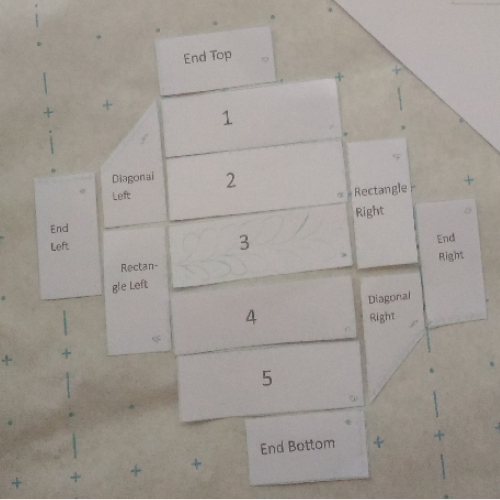
This is the overview of the pattern:- I printed out the diagram from the original tutorial, figured out my sizes and labelled and numbered the rectangles for easier construction.
Add the vines and roses…

Stitch up…
The bag completed without handles and closing flap.
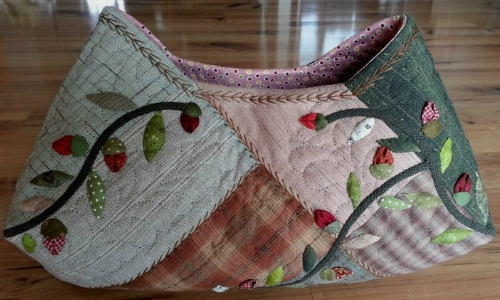
Please note I’m not a designer. I just worked everything out from the diagram and loved it so much I wanted to share it. Some sewing skills and a little quilting experience will help. The bag is actually quite easy to make after all!
For the pattern choose mixed prints of your choice and place the fabric to get a nice balance.
You’ll need:
5 rectangles of mixed prints each 8-7/8 inches (eight and seven eighths) by 3 inches (22.5cm by 7.5cm)
6 small rectangles of mixed prints each 5-7/8 inches (five and seven eighths) by 3 inches (15cm by 7.5cm)
2 small rectangles of mixed prints cut at a 45 degree angle. (They’re the same size as the small rectangles, but cut at a diagonal). For an easy way to get the paper template diagonal, I just folded the rectangle over and made the fold mark to get the center. Then I opened the paper template and cut from the center line to the opposite end point of the rectangle. It’s hard to explain, however using one of the small paper rectangles to try out will make more sense. Use a quilting ruler or do the math route and measure a 45 degree angle from the center. Same thing.
27 1/2 inches (70cm) fabric for the lining.
27 1/2 inches (70cm) batting.
These measurements already have a seam allowance of 1/4 inch (6mm).
If you’re not too familiar with making bags, print out a copy of the numbered diagram. Cut out each rectangle and tape the paper pieces together as I did. It really gives you a feel for the whole thing before you make it with fabric. It only takes 20 minutes and puts you strides ahead.
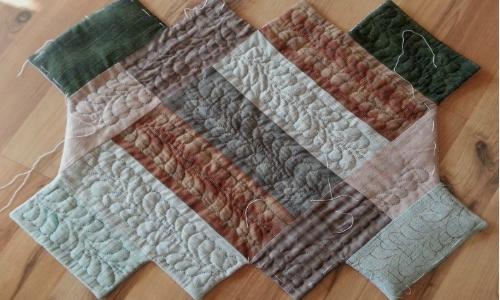
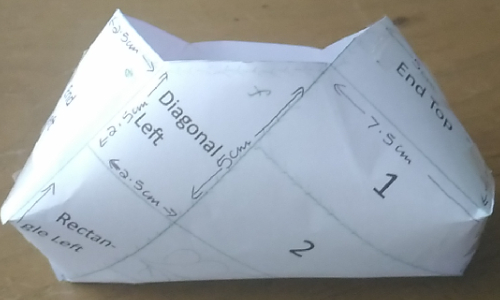
 Then following the tutorial, start to fold and secure what would be the seams of the fabric. I followed the pictorial steps and this is how it came out. It really gave me a feel for the way the bag, patterns, diagonals etc. should go.
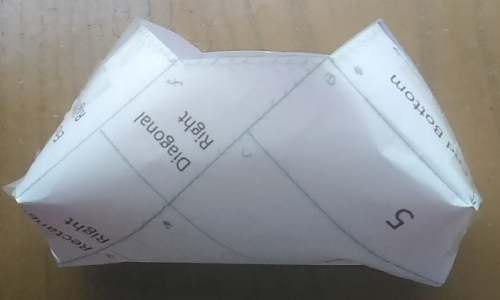
The other side…
The size of the model is very small, but then I’ll show you exactly how I sized it up.
Once I knew how the bag and fabric strips came together, it was easy to size up, and made it easy to choose my fabric placement.
You would have seen the sizes I marked on the paper. These are the actual size of the pieces on the pattern that I printed out. I multiplied those sizes by three. Here it is again:-
5 rectangles of mixed prints each 8-7/8 inches (eight and seven eighths) by 3 inches (22.5cm by 7.5cm)
8 small rectangles of mixed prints each 5-7/8 inches (five and seven eighths) by 3 inches (15cm by 7.5cm)
2 of the 8 small rectangles will be cut at a 45 degree angle. To do that, simply fold the rectangle in half, and cut straight off from the fold line to opposite end. That will give you the exact diagonal.
27 1/2 inches (70cm) fabric for the lining.
27 1/2 inches (70cm) batting.
These measurements already have a seam allowance of 6mm.
The finished bag size will be:-
12 inches in length (30cm length) and
6 inches wide (15cm wide)
7 1/2 inches (19cm)at the highest point (and around 5 inches (13cm) at the middle point).
If you want the bag larger then simply increase the size of the pattern pieces by 4. For a smaller tote, increase 2 times, and so on.
Next, cut the paper pattern pieces out like this:-
If you’re computer savvy size up accordingly before printing. You can size up easily on your cutting board with grid lines or use pattern paper with grid lines so that your sizing is correct. It will mean marking up on your pattern paper but it doesn’t take too long, and then you have a nice pattern to use all the time!
Once you have your paper pattern pieces sized up, cut out your fabric. Seam allowances are already included. Use the usual 6mm seam(1/4 inch)
To stitch the bag:-
Fabric pieces right sides together,
-Stitch fabric pieces 1 to 5 together as shown.
-Stitch ‘End Top’ to no.1, and ‘End Bottom’ to no.5 as shown above.
-Stitch ‘Rectangle Right’ and ‘Diagonal Right’ together at the ends, stitch to the body. Then stitch ‘End Right’ to the side, lining up as shown in the layout. Repeat for the left side.
You’ll then have something like this without the layers and quilting of course.
Add the pockets to the lining (see it in the full tutorial- link below).
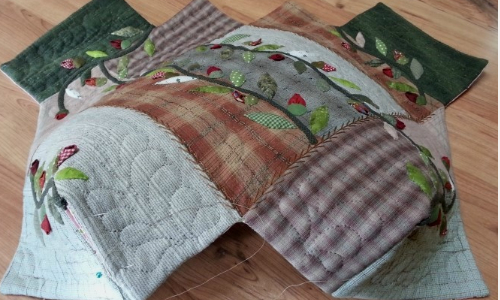
Sandwich lining, batting and top. Stitch. Turn right side out, and free motion quilt a feather.
Position and stitch on the vines and roses.
Follow the tutorial to stitch up the bag (link to tutorial below). The practice run with the paper pattern made the design very clear. After that it was really easy to make this lovely bag.
Finish with large wheat stitch (see wheat stitch here). Beautiful.
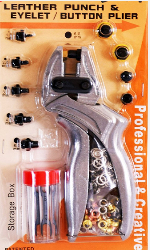
For the handles and clip over, use a ‘Leather Punch and Eyelet Plier’ I saw this one on Amazon $24 … wow, expensive though. Unless you’re going to use it more than once. If you need one, click here to get it from Amazon.
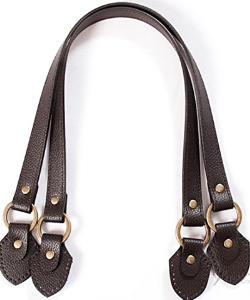
and I saw some handles, length 23 inches. It looks like the same length as the bag in the tutorial.
Click here to see it on from Amazon.
Hope you’ll have as much fun as I did.


